Quick Answer:
You can record video on PowerPoint using its built-in feature, a third-party screen recorder (SurFlex Screen Recorder), an online service (ScreenCapture), or a browser extension (Loom).
PowerPoint recording is an effective method to preserve presentations and enhance the delivery of ideas. Consequently, it is widely employed in various situations for different purposes. If you desire to record video in PowerPoint but are unsure of the process, this guide will provide you with all the practical tips to successfully record videos with PowerPoint.
Table of contents
Record Video with PowerPoint Directly
Tool: Microsoft PowerPoint
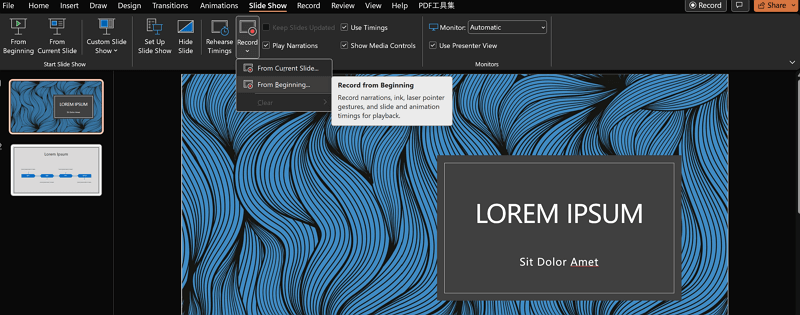
You may have noticed that there is a Slide Show tab and a Record tab in PowerPoint when you use it. Actually, Microsoft PowerPoint has built-in screen recording features that allow you to record video in PowerPoint without installing any extra app.
Moreover, it will help you capture your annotation, audio, and video from a webcam during the PowerPoint recording. That’s why you can use it to record a PowerPoint presentation with audio and video. This will help record yourself presenting a presentation easily.
To record video with PowerPoint directly:
Step 1. Open the PowerPoint presentation you’d like to record.
Step 2. Go to the Slide Show or Record tab and click the drop-down menu under Record.
Step 3. Choose to record from the beginning or from the current slide.
Step 4. In the recording window, choose to enable or disable audio and video according to your needs.
Step 5. Click the Record button in the top-left corner to start the presentation recording.
Step 6. When you need to end the recording, click the Stop button and close the recording window.
Step 7. In PowerPoint, click File > Export > Create a Video.
Step 8. Select the video quality and content, and then click Create Video.
Step 9. Set the storage path and video name, then click Save.

Record Video in PowerPoint with a Camera
Microsoft PowerPoint only saves the recorded video as MP4 on your computer. If you want to save the presentation video recording in another format, you will need a third-party screen recorder like SurFlex Screen Recorder.
It enables you to record any portion of your screen. Thus, whether you want to record a PowerPoint window or a selected portion of your screen, you can get it done easily. Besides, SurFlex Screen Recorder can record webcam and audio along with the video. If you are looking to record PowerPoint with audio or record PowerPoint presentation with webcam, it will do you a favor.
To record video in PowerPoint via SurFlex Screen Recorder:
Step 1. Launch SurFlex Screen Recorder on your computer and click Settings to customize the output options.

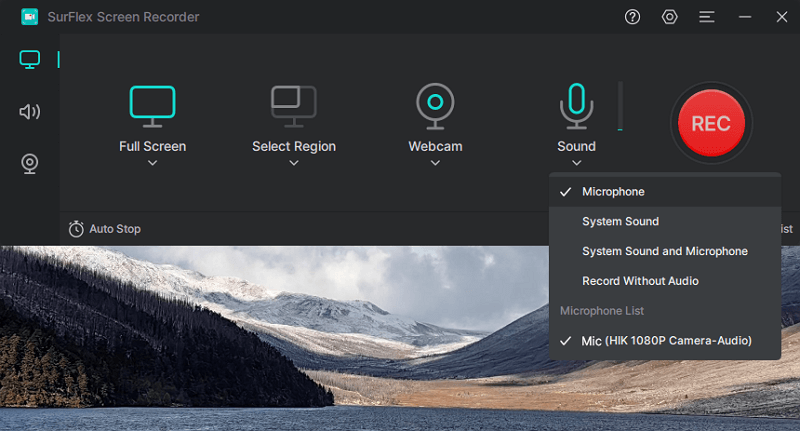
Step 2. To record a PowerPoint presentation with yourself talking, you need to enable audio recording and choose Microphone or System Sound and Microphone.

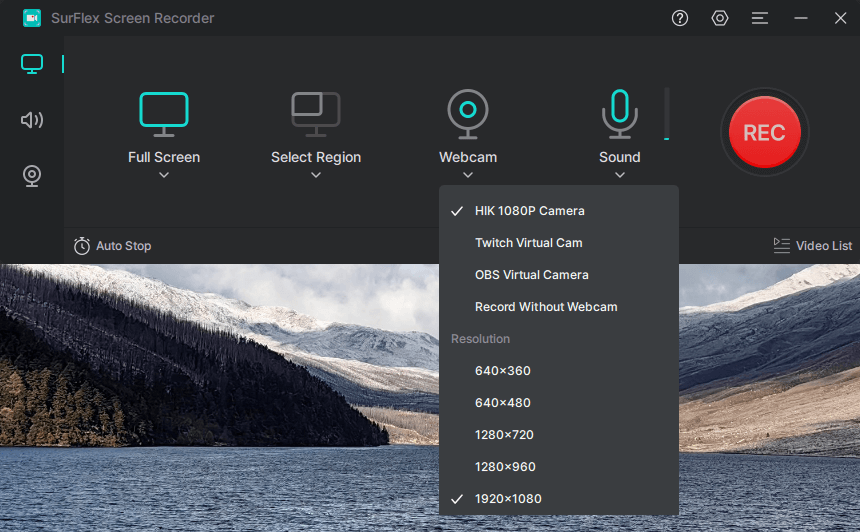
Step 3. If you want to record a presentation with the webcam, turn on Webcam recording and select the webcam settings.

Step 4. Select the recording area you’d like to capture from your PowerPoint and click REC.

Step 5. Once the PowerPoint presentation recording is finished, click Stop and then check the video in the recording list.

Record Video on PowerPoint Online
Using a desktop app is not the only solution to record a PowerPoint presentation. Web-based services like online screen recording websites and browser extensions are also helpful for recording video on PowerPoint. Generally, they can record the computer screen, a browser tab, or a window. You can also choose to record audio and webcam during the screen recording.
If you don’t mind the watermark added to the video, you can follow the steps below to record a video on PowerPoint for free using ScreenCapture.com. It will save the PowerPoint presentation recording as an MP4 file in HD quality.
To record video on PowerPoint online:
Step 1. Prepare the presentation.
Step 2. Open a browser on your PC or Mac and then visit ScreenCapture.com.
Step 3. Check the video and audio sources you’d like to capture.
Step 4. Click Start Recording.
Step 5. Choose Window and select the PowerPoint window. Then click Share.
Step 6. Click Stop Sharing when you need to end recording the video.
Step 7. Go back to ScreenCapture and click Stop Recording.
Step 8. Preview the video and then click Download to save it to your computer.

Record a Video in PowerPoint via Chrome
As mentioned above, you can also use a browser extension to record a video in PowerPoint without any software. Here I’d like to take Loom Screen Recorder & Screen Capture as an example.
Loom provides rich screen recording and video editing features for you to record screen on PC or Mac. It not only allows you to record a PowerPoint presentation but also works to record screens in many other situations. If you want an installation-free method to record on PowerPoint on a PC, Mac, or Chromebook, it is a feasible choice.
To record a video in PowerPoint via Chrome:
Step 1. Add Loom to your Chrome or another supported browser.
Step 2. Sign in and finish the basic settings.
Step 3. Pin Loom to the toolbar of Chrome.
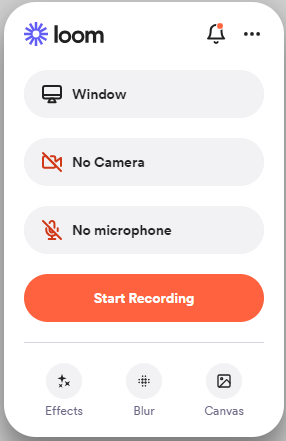
Step 4. Click the Loom icon and choose to record Window.
Step 5. Set up the webcam and audio input.
Step 6. Click Start Recording.

Wrapping Up
You can use one of these tips to record a video of yourself on PowerPoint easily. Since all these PowerPoint recording tools are compatible with both Windows and macOS, you can use any of them to record a presentation on Mac, too. Besides, if you are using Windows, the built-in Xbox Game Bar is also a feasible solution to record a PowerPoint presentation with audio. For more details, you can go to the guide on Xbox Game Bar screen recording.
About the Author
Related Articles
-
How to Record a Google Slides Presentation with Audio and Video
You will know how to record a Google Slides presentation with audio and video easily in three ways. Read on to check the details.
Myra Xian Updated on -
How to Record Slide Show on PowerPoint: Detailed Guide
You will know how to record slide show on PowerPoint using the built-in recording feature in Microsoft PowerPoint and easy third-party tools.
Myra Xian Updated on -
How to Record a Presentation on Mac: 3 Tips
You will know how to record a presentation on Mac using the built-in feature in PPT, the preinstalled app on Mac, and a third-party tool.
Myra Xian Updated on

