Popular Screen Recording Tips
Quick Answer:
There are Google Meet record extensions you can use to record meetings with ease: Beesy (Google Meet only), TLDV (Google Meet, Zoom, and Microsoft Teams), or Awesome Screen Recorder (support any on-screen content).
When you record Google Meet meetings on a PC or Mac, there are many types of tools available for help, including desktop apps, online services, and browser extensions. Among them, a Google Meet recording extension is probably the easiest way to try since it allows you to directly record a meeting in Google Meet from the toolbar. If you prefer to use this type of Google Meet recorder, check the three options below and use any of them to record Google Meet meetings without difficulty.
Table of contents
Free Google Meet Recording Extension: Beesy
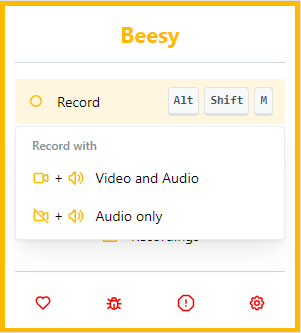
If you want to record Google Meet for free, you can try Beesy. This Google Meet recording extension for Chrome allows you to record a meeting on Google Meet with audio or record Google Meet audio only. When you record a Google Meet video, it allows you to save it in WebM or MKV format. It also provides screen recording shortcuts for you so that you can conveniently capture your desired content.
Most importantly, Beesy is free to use, allowing you to record on Google Meet without any cost. If you are only a participant, you can use this add-on to record on Google Meet freely.
To record Google Meet via the Beesy extension:
Step 1. Visit Beesy from the Chrome Web Store and click Add to Chrome.
Step 2. Click the Extensions icon and pin Beesy to your toolbar.
Step 3. Go to meet.google.com and start or join the meeting you’d like to record.
Step 4. Click Beesy and hover over Record to choose the recording mode, Video& Audio or Audio Only.
Step 5. Then click Record or use its default shortcut, Alt + Shift + M, to start recording.
Step 6. Click Allow in the prompt and the recording will start immediately.
Step 7. When you are done, press Alt + Shift + X, and the recording will be downloaded to your computer automatically.
Step 8. Go to the Downloads folder to check the video.

Advanced Google Meet Record Extension: TLDV
If you want a Google Meet recording extension with more advanced features, using the TLDV Chrome extension is a better option. It helps to record and transcribe Google Meet meetings, sparing you from manually taking notes. Moreover, it has advanced features like automatic recording, sharing recording links, and generating summaries. In addition to Google Meet, it supports other popular platforms, including Zoom and Microsoft Teams. In short, TLVD combines a screen recorder with AI, making itself an easy yet powerful choice for Google Meet recording.
However, you need to sign in to TLVD with the account you use to join the meeting. Besides, you need to add the AI Notetaker to your meeting, which requires the permission of the meeting host. If you don’t mind, follow the steps below to record a meeting in Google Meet.
To record a Google Meet video via TLDV:
Step 1. Visit TLDV via the Chrome Web Store and add it to Chrome.
Step 2. Click Extension and pin TLVD to your toolbar.
Step 3. Click its icon, sign in with your Google Meet account, and then set it up.
Step 4. Open a new tab to navigate to Google Meet and join the meeting.
Step 5. When you are ready, click the TLDV record icon and allow the AI bot to join the meeting.
Step 6. During the recording, you can choose to share the recording with yourself via email.
Step 7. Once completed, click the Stop icon and click Stop and Save again.
Step 8. Check your email to view the recording.

Comprehensive Google Meet Recording Extension: Awesome Screen Recorder
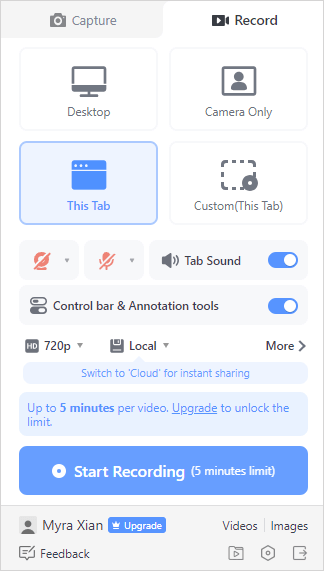
Whether you are going to record Google Meet or other content, you can use Awesome Screen Recorder to get it done. After adding this extension to your browser, you will be able to record a browser tab, an app window, the entire screen, or a webcam with audio. Therefore, it can also help when it comes to recording Google Meet without permission or without others knowing.
To record a meeting in Google Meet:
Step 1. Add Awesome Screen Recorder to your browser and pin it to the toolbar.
Step 2. Click it to sign in and set up the basic options.
Step 3. Go to the Google Meet tab and click the icon of the screen recorder.
Step 4. Choose to record This Tab and customize other recording options.
Step 5. Click Start Recording.
Step 6. Once completed, click Stop and preview the recording.
Step 7. If you are satisfied with the video, click Download to save it to your computer.

Wrapping Up
There’s no doubt that a Google Meet extension is convenient to use. However, when compared with a desktop screen recorder, it generally offers fewer features and is less flexible. If you don’t mind using an app, you can try SurFlex Screen Recorder. After installing it on your computer, you will be able to easily record Google Meet sessions on your Mac or PC without any hassle.
About the Author
Related Articles
-
How to Record Zoom Meeting as a Participant in 5 Ways
You will know how to record Zoom meeting as a participant either with or without permisson on your PC or Mac easily.
Myra Xian Updated on -
How to Record Google Meet on Mac: Easy & Free
If you are wondering how to record Google Meet on Mac, check this guide and you will know how to capture video and audio from your meeting.
Myra Xian Updated on -
How to Record Zoom Meeting on iPad in 3 Easy Ways
You will learn how to record Zoom meetings on an iPad using various proven methods, whether you are the host or a participant.
Myra Xian Updated on

